How to Set Up and Configure Your Brother Printer
Your complete guide to installation, driver setup, and troubleshooting.
Setting up a printer can seem tricky, but with the right steps, you can have it ready to print in just a few minutes.
Follow this detailed guide to install, configure, and maintain your printer efficiently.
Step 1: Setting Up Your Brother Printer
Unbox the printer
Carefully remove all packaging, tapes, and protective materials.
Place the printer on a flat, stable surface near a power source and your computer or router.
Connect power and turn on
Plug in the power cable and press the power button.
Wait for the printer to initialize and display the home screen.
Load paper and ink/toner
Insert paper into the tray and adjust the guides.
Install the ink cartridges or toner following the instructions on the screen or manual.
Connect to your computer or Wi-Fi
USB Connection: Plug the USB cable into your computer.
Wireless Connection: Use the printer’s display menu to select your Wi-Fi network and enter the password.
Once connected, the Wi-Fi or connection indicator light will turn on.
Step 2: Download and Install Printer Drivers
Drivers allow your computer and printer to communicate properly.
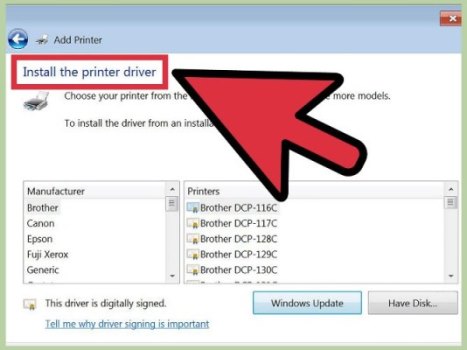
✅ For Windows:
Go to a printer driver resource or the official website.
Enter your printer model number and select your operating system.
Click Download and wait for the driver setup file.
Open the downloaded file and follow the on-screen installation instructions.
Once installed, open your computer’s Printers & Scanners settings and confirm that your printer appears in the list.
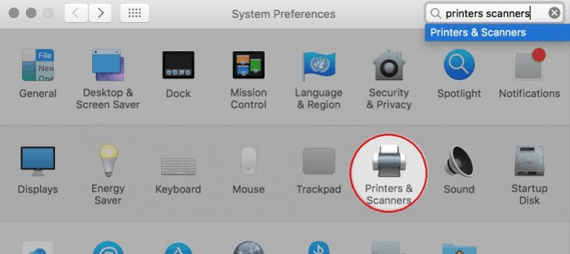
✅ For macOS:
Visit a driver source and search for your printer model.
Download the macOS driver package.
Double-click the
.dmgfile and follow the setup prompts.Add the printer via System Preferences → Printers & Scanners → + Add Printer.
💡 Tip: Keep drivers updated regularly to ensure consistent performance and new feature compatibility.
Step 3: Fix Printer Offline Issue
If your printer shows as “Offline,” follow these steps:
Check power and connections
Ensure the printer is powered on and properly connected to Wi-Fi or USB.
For wireless printers, check that your device and printer are on the same network.
Set printer as default
On Windows: Go to Control Panel → Devices and Printers → Right-click your printer → Set as default printer.
On macOS: Go to Printers & Scanners and select your printer as the default device.
Restart printer spooler (Windows only)
Press
Win + R, typeservices.msc, and press Enter.Find Print Spooler, right-click, and choose Restart.
Reinstall or re-add printer
Remove the printer from your list of devices, then add it again.
Reinstall the drivers if necessary.
Step 4: How to Reset Your Printer
A reset can fix connection problems, error codes, or paper jam alerts.
Soft Reset (Quick Restart)
Turn off the printer.
Unplug it from power for 60 seconds.
Plug it back in and power it on.
Factory Reset (Full Reset)
⚠️ This will erase all custom settings (Wi-Fi, preferences, etc.).
Go to the Menu or Settings button on the printer screen.
Navigate to All Settings → Initial Setup → Reset → Factory Reset.
Confirm when prompted and wait for the printer to restart.
Frequently Asked Questions (FAQs)
Q1. How do I find my printer’s model number?
Check the front panel or label on the back of the printer. It usually appears as a series of letters and numbers.
Q2. My printer isn’t connecting to Wi-Fi — what should I do?
Make sure your Wi-Fi password is correct and that your printer is within range of the router. Restart both the printer and the router.
Q3. Can I install the printer on multiple devices?
Yes, once the driver is installed, you can add the printer to other computers or mobile devices connected to the same network.
Q4. Why is my printer printing blank pages?
Ensure ink or toner levels are sufficient and that cartridges are installed properly. Run a nozzle or printhead cleaning from the printer’s maintenance menu.
Q5. How often should I update my printer drivers?
Check for updates every few months or after major operating system updates for better performance and compatibility.